Update SSL Certificates on SharePoint 2013 and SharePoint WebApps Server
For the first official post to AzureTracks.com, I’ve decided to share an experience I had working with SharePoint 2013 certificates and WebApps. This happened before the official work to get this client ready for Office 365 Migrations. Before I was able to fully assess a client environment, their certificates expired on SharePoint about 2 weeks before a scheduled assessment and SharePoint Online migration. I needed to get the certificates renewed quickly for the client as their WebApps server had stopped working and impacted their production environment. They had some departments working heavily in SharePoint with records, process flows, and email to library functionalities. Once I got the certificates sorted out I ran some health checks and then prepared their SharePoint environment for migration to SharePoint Online.
The steps below is what was done to download the new certificates from GoDaddy and apply them on the servers needed locally. I’ll start by going over a few assumptions for this article.
Before we begin, there are a few assumptions here:
- You have been exposed to SharePoint administration.
- You have been exposed to SSL Certificates and Issuers.
- You have a basic understanding of Windows Server management tools.
- We will use GoDaddy as our SSL provider in this example for ease.
- We will use a Wildcard certificate in this example.
- Log into GoDaddy > Products > SSL Certificates > *.company.com > Manage > Download IIS Certificate Version
- Copy the zip file to a folder and decompress it.
- Create a sub-folder called ‘ExportedKey’
- You will copy the top-level folder to both your SharePoint and WebApps servers to complete the needed steps.
- On the SharePoint server:
- Copy that certificates folder to your desktop to work with, make sure you delete it off the server later. You would not want to leave your certificates sitting there.
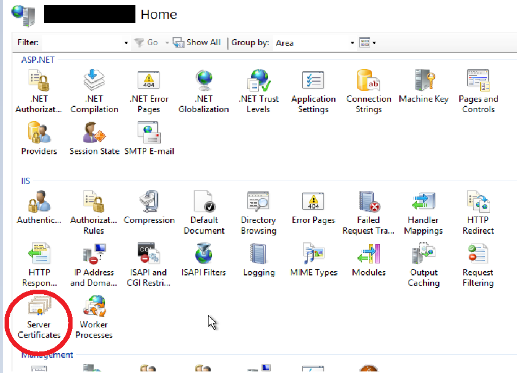
- Open IIS Manager
- Go to Server Certificates
- Create a certificate request > Fill in logically with your company Details correctly. Pay attention to the following details:
- Microsoft RSA SChannel
- 2048 bit
- Filename “xxxx_csr.txt” save in root folder of certificate work locally.
- Make this a nice plain name for your certificate signing request so you can easily reference it in 6 months if needed.
- Still in Server Certificates on IIS Manager
- Right-click and Complete Certificate Request
- Enter the file name (select by browsing)
- Enter a Friendly name as “2017-18 Wildcard” so that you can see it easily in the list of certificates later.
- Personal
- In MMC for Certificates:
- Export key “all certs”, Private Key
- Password as “something secure here”.
- Copy the exported key file (pfk) to a 2nd location such as your own PC. Make sure you encrypt that folder using something awesome like BitLocker. You do not want bad-guys to get their hands on your certificates. I tend to track every password I enter for anything in various KeePass databases that are purpose oriented.
- In IIS Manager:
- Sites > Change binding on port 443 to new cert
- Check all sites as needed
- iisreset
- Load sites in IE and Firefox to validate certificate date functionality is all there for your SharePoint sites.
- Be very thorough in your testing. Spending time testing your sites now will prevent service tickets and customer impact later.
- On SharePoint Apps server:
- Copy that certificates folder from your main SharePoint server to your desktop to work with, make sure you delete it off the server later. You would not want to leave your certificates sitting there. You have a private key certificate in there now. Do not leave that sitting around.
- In MMC for Certificates, do the following to add that private key certificate:
- Import
- All normal default options > use “something secure here” password that you set when creating the key.
- Check box “Mark as Exportable” to provide a secondary server for key exports, or do not to keep better security practices.
- Extended = Checked Yes
- Finish
- Check in IIS Manager > Certificates that the new Cert is showing correctly for the new year.
- In IIS Manager:
- Sites > Change binding on port 443 to new cert
- Check all sites as needed
- iisreset
- Load sites in IE and Firefox to validate cert date & functionality = ok.
- Load sites in IE and Firefox to validate certificate date functionality is all there for your SharePoint sites.
- Be very thorough in your testing. Spending time testing your sites now will prevent service tickets and customer impact later.
- If not, validate the cert is correct again, iisreset, then reboot server.
Ensure that once you have your certificates updated that you really test your SharePoint sites. Load a few different sections, test any special functionality that you’re using such as email to library, notifications, and especially the embedded web apps.
Make sure that you use whatever your favourite medium is to create some documentation for your company. After all, if you create the documentation this year from a set of steps that you know work; maybe next year will go smooth as silk!
Hopefully this has helped you get your certificates renewed and get you set for success in the future. Remember that for on-prem SharePoint, you need to renew the certificates regularly.
PRO TIP: Set your Service Desk ticketing system to create a ticket on a schedule a couple of weeks ahead of certificates expiring to keep your company on track for the next time. It’s not always about you! The next person helping your company needs to be setup for success just as much!