Azure Migrate – Part 2
In the last article, you were introduced to Azure Site Recovery and Azure Migrate. These services allow you to discover, assess, and migrate workloads into Azure quickly using a framework built using the foundations of Azure Site Recovery. We talked a lot about disaster recovery foundations, technical requirements, and some key differences between ASR and Azure Migrate. Today, we’ll be working in Azure Migrate and we want to get you ready to do a test fail-over of a workload from your VMWare environment into Azure. There are lots of steps to follow, so give yourself about 3 hours to work through all the reading and steps. You may need to step out of this article to perform changes or allow scanning time within your VMWare environment as part of your readiness. I want you to be comfortable using Azure Migrate so let’s get started!
If you’ve jumped to Part 2 here, please take a look at the requirements in the Introduction to Azure Migrate article here: Azure Migrate – Introduction.
A quick recap of what Azure Migrate will help you with:
- A central hub to manage discovery, assessment, connectivity to Azure, and deployment
- Integration with tools to help you migrate such as ISV Offerings from Carbonite, Turbonomic, Lakeside, Rackware, and others
- Database Migration Assistant to assess databases, then using Database Migration Service (DMA & DMS) to migrate databases
- Webapp Migration Assistant to assess and migrate web apps workloads
- Movere to assess server workloads
- Use Lakeside ISV tool to assess and migrate VDI (virtual desktop infrastructure) into Windows Virtual Desktop in Azure
- Provides a unified migration platform
We will be doing a walk-through on getting your environment in VMWare setup with Azure Migrate, then we will perform a server assessment to determine Azure readiness.
What You Need Already
- An Azure tenant
- Permissions to create an Azure Migrate project
What You will Need to Do
- Install your OVF, VHD, or physical appliance depending on if you use VMWare, Hyper-V, or a physical box to install your replication server onto.
- Create an Azure Key Vault to use with your storage keys
We will be walking through the VMWare permissions and steps for Azure Migrate today. I’ll provide some additional Microsoft resources for you at the end of this article if you are using Hyper-V or a physical server.
Permissions Needed
In case you need to request permissions, you will need the following:
- You will need Contributor or Owner permissions under Azure portal > Access Control (IAM)
- If you are running server assessments the Contributor permission will be enough.
- To run agentless server migration within VM ware you should have Owner (or Contributor and User Access Administrator) permissions.
- The Admin should also navigate to Azure > Azure Active Directory > Users > User Settings and set App Registrations to Yes.
- This setting does not weaken security according to Microsoft: Learn more
You may need to request a Tenant or Global Administrator to assign one of these permissions for you to be able to register the replication / migration project server later.
Get the VMWare Environment Ready
Often overlooked during pre-migration trials is this step:
- Verify your VMWare guests and that your vCenter server you wish to migrate meet the migration requirements.
- Setup your assessment account in vCenter Server to allow for discovery. It should be a read-only account.
- Reference the previous article Azure Migrate – Introduction to ensure that your VMWare server meets requirements.
It’s no small task to ensure your environment is ready and meets all the requirements for security and permissions. Don’t worry, I’ll wait right here for you…..
Setup your Azure Migrate Project
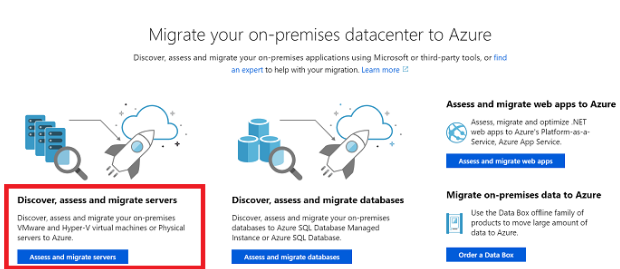
In Azure portal browse to All Services and search for Azure Migrate. Under Services select Azure Migrate.
In the Azure Migrate blade, select Discover, Assess and Migrate Servers and click on Assess and Migrate Servers.
Next, under Getting Started select Add Tools. In the Migrate Project tab select your Azure subscription and create a resource group if you have not done this already. If you already created your resource group select it here.

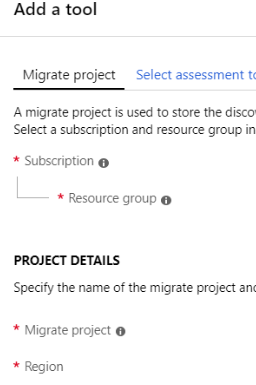
In the Project Details section, Name you project using your defined naming standard (That is another article on its own in the queue!) such as “Bobs-Widget-Company-Migrate-Test”. Next select the region that is supported nearest to your data-center by connection. Select Next.
In the Select Assessment Tool screen, select Azure Migrate: Server Assessment tab and click on Next again.
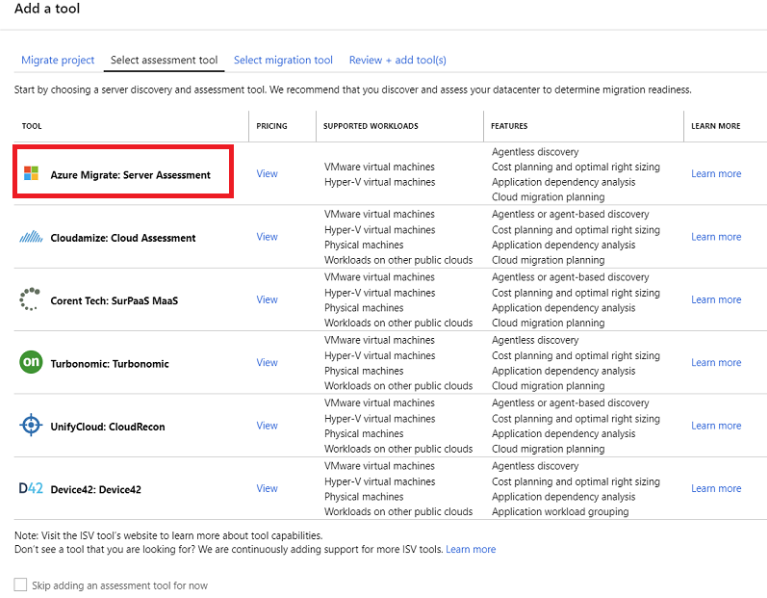
Here you can choose to add tools such as ISV tools to assist you in your migration like we discussed in the previous article. We will add the Azure Migrate: Server Assessment tool only for our example.
On the tab Select Migration Tool > Click the Skip Adding an Assessment Tool for Now box near the bottom and click on Next.
Finally, on the Review + Add Tools tab > Review your settings and then click on Add Tools. Azure will process your changes and take you to your project page.
If you do not see your project, go to Azure Portal > Azure Migrate > Dashboard > Servers.
Scoping Your Discovery in vCenter
You can scope your discovery by limiting the access with the vCenter Server credentials we are using.
Let’s create a vCenter user and map a role to that user. Then we’ll assign permissions based on our role. This will make it easier to manage and break things apart at scale should you have 1000’s of VMs to discover.
- In vCenter Web Client as the Server Administrator, click on Administration > SSO Users and Groups > Users tab and select the New User icon.
- Enter the credentials to use here and note them for later.
- Go to Administration > Role Manager and select your vCenter Server from the drop down and click on Create Role.
- Type the role name such as “BobsAzureMigrateTest” and assign the permissions as follows:
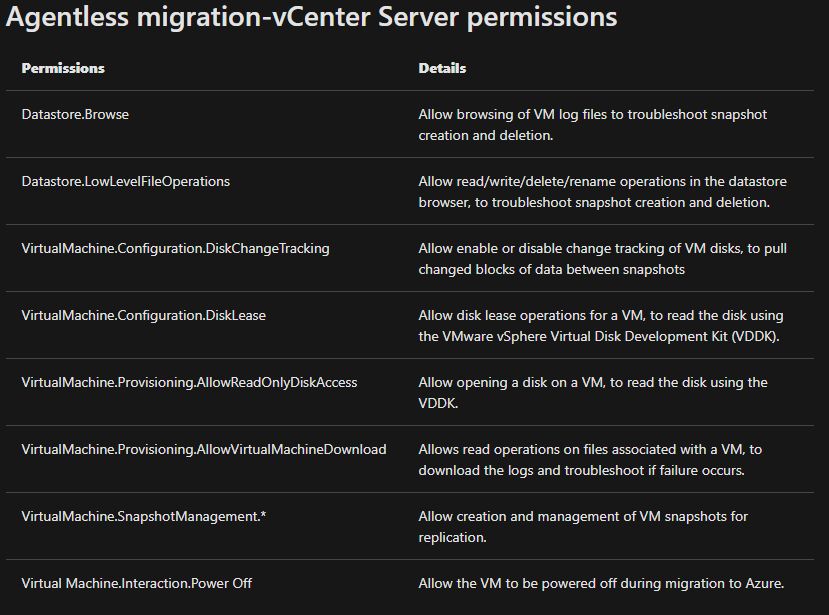
- Click OK.
We must now assign these permissions:
- For Server Assessment we need only to have the Read-Only permission assigned.
- Select the parent objects where the VMs to be discovered are hosted. All parent objects in the hierarchy up to the data center level are to be included.
- Check the box ‘Propegate to children’ then click Add and click Ok in vSphere Web Client.
An alternative method is to block access to the user role we created on objects you do not want to discover with this role.
Set up the Appliance Virtual Machine
Azure Migrate runs as a VMWare VM appliance that performs discovery, sends VM metadata and performance data to Azure Migrate Server Assessment.
To setup the appliance perform the following steps:
In Azure Portal > go to Azure Migrate > Servers blade, then select Discover and in Step 1 you will click on Download to obtain your OVA file.
This can take a moment to download depending lots of factors, so if it’s slow go make a coffee and read ahead.
Azure Migrate appliances support discovery of up to 10,000 servers per appliance and you can have multiple appliances within an Azure Migrate project with a maximum of 35,000 discovered server VMs.
Validate your MD5 hash using the links at the end of article to ensure you’re matching up with the latest versions and correct hash from Microsoft.
Create the Appliance VM Using the OVF Template File
In your vSphere Client console, click on File > Deploy OVF Template and the wizard will load.
Next, enter the Name and Location of your VM and select the inventory location for the hosting. Select the Host or Cluster where this VM will be running.
Select your Storage location and under Disk Format specify the disk type and size.
Under Network Mapping, ensure you select a network that has Internet connectivity for the VM as connectivity is required to send metadata to Azure Migrate Server Assessment.
Review your settings and confirm, then click on Finish and allow vSphere to create your VM appliance.
Remember that the appliance will need to comply with the connectivity requirements for Azure Ips and URLs.
Configure the Appliance
You will need access to the credentials created in previous steps shortly so ensure you have your credential manager handy.
Note:
Disable your popup blocker now to save yourself some headaches. If you want to be really cool, use a separate Windows 10 desktop to do your management and configure a browser just for administrative duties….or better yet use a bastion host to accomplish this if you are working remotely. If you’re not used to this, don’t worry — I’ll cover bastion hosts and Azure Bastion in another article soon.
In the vSphere client console, right-click your new Azure Migrate VM and select Open Console. Provide the language, time zone, and password information noting where needed for future reference.
Open a browser on another machine that can connect to your Azure Migrate VM.
Open the URL: https://azure-migrate-vm-name-here:44368 –Here you can use the name of the VM or the IP Address.
You can also open the app from the appliance desktop itself by selecting the app shortcut, but we wouldn’t manage a server by accessing it directly of course.
Next, in the web app select Set up Prerequisites and enter the following information as required:
- Accept the license.
- The app will validate connectivity for Internet access. If you are using a web proxy enter those details and credentials as prompted.
- Time Sync should be in sync with Internet time — this is a discovery dependency.
- Install Updates.
- Install the VDDK. The appliance will check that the VMWare vSphere Virtual Disk Development Kit is installed. Azure Migrate uses the VDDK to replicate machines to Azure.
- If you have a challenge at this step simply download the VDDK 6.7 from VMWare directly and extract the zip contents to the specified location on your appliance VM.
Registering the Appliance with Azure Migrate
You’re getting close now! This is getting exciting as you’re almost ready to
On your appliance VM browser interface (https://azure-migrate-vm-name-here:44368) you should see a login screen now. If not, ensure you have disabled the popup blockers.
On the new browser tab, sign in using your Azure credentials that will allow you to register the service. It should be noted that this application does not support signing in with a PIN.
After you get signed into Azure, go back to the web app and select the subscription that you will use with Azure Migrate for this project, then select the project itself that we created earlier.
Enter a name for this server that is 14 characters or less and click on Register.
Start Continuous Discovery in vCenter
To perform discovery operations we must connect the appliance to vCenter now.
- In the section Specify vCenter Server Details > enter the FQDN or ip address of your vCenter server.
- Enter the credentials that we created for vCenter to perform read-only discovery operations.
- Click on Validate and ensure that we have a connection that is working.
Specify VM Credentials
Specify the credentials in the web app that you would like to use for Windows and Linux VM discovery. These credentials allow for discovery of applications, roles and features, visualizing dependencies, and general access into the VM. If you would like more details please see: https://docs.microsoft.com/en-ca/azure/migrate/migrate-support-matrix-vmware#assessment-vcenter-server-permissions
- In the Discover Applications and Dependencies on VMs section, click on Add Credentials.
- Select Operating System and enter the required fields including a friendly name and click on Add.
- Specify all desired operating system credentials for your environment.
Once you’re done, click on Save and Start Discovery. Exciting stuff! This should take about 15-20 minutes but results will vary depending on your resources and environment.
Now, the hard part is the waiting. Once the discovery has been completed the Azure Migrate portal has to process the data to show to us. For 500 VMs, Microsoft advises to wait approximately 1 hour for the application inventory to process and display fully in your portal.
Verify VMs are In Your Azure Migrate Portal
In the Azure Portal > Azure Migrate > Servers > Azure Migrate: Server Assessment page > click on the Discovered Servers icon and you should see your servers listed here.
Take a few minutes to validate this list, especially if you have setup a scope in vCenter. You should not see servers that you have blocked or not given permission for the vCenter username to access for the Azure Migrate project that we’ve just implemented.
Set Up your Assessment
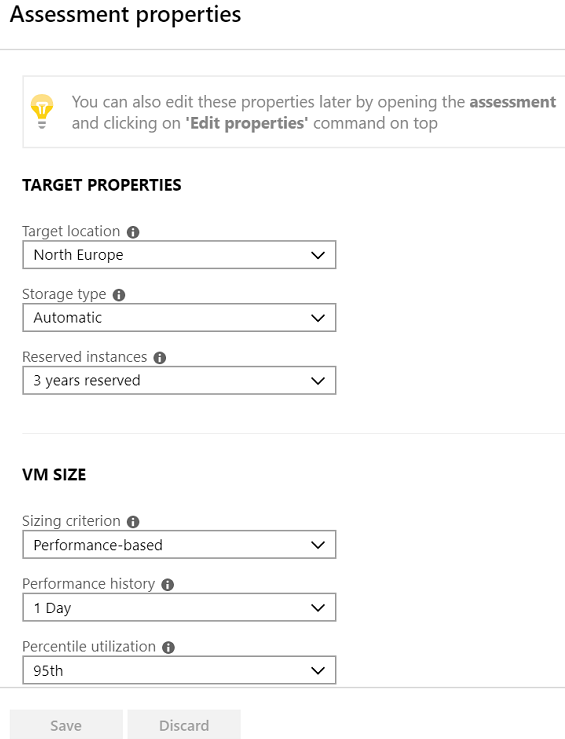
When we set up the assessment, there are two types that we should consider here:
- Performance based
- This looks at collected VMWare performance data to determine CPU, Memory, and uses the IOPS and throughput of on-premises disks to determine between standard or premium managed disk.
- As On-Premises
- This takes the configured sizes from on-premises and suggests your Azure sizing based on this (and not the actual usage).
- If you’re anything like me and tend to overspec your servers for production to give users a better experience; you’ll be paying for that costly choice in Azure. Ensure that if you decide you want to go with an over-spec’d server in Azure, that you ALSO consider the performance based suggestions from this tool — and that you build small and grow into your usage. This will help you control your Azure datacenter costs upfront, and over time if you evaluate on a regular basis.
You should read up on the Azure Migrate best practices here: https://docs.microsoft.com/en-us/azure/migrate/best-practices-assessment so you have all the information.
Ok, enough about all that. Let’s assess:
- In Azure Portal > Azure Migrate > Servers > Azure Migrate: Server Assessment > click Assess.
- Enter a name in Assess Servers and click on View All to review the properties.
- In Select or Create a Group click on Create New and specify a Group Name.
- A group gathers multiple VMs together for the assessment.
- Add the machines that you want into the group.
- Click on Create Assessment to create the group and run your assessment.
- Once created, you can export your assessment as an Excel file under Servers > Azure Migrate: Server Assessment > Assessments > Export Assessment.
View Your Assessments
Now that you’ve done all this work to create an Azure Migrate assessment, let’s see what it will tell us about our vCenter environment:
Export your assessment as an Excel file under Servers > Azure Migrate: Server Assessment > Assessments > Export Assessment.
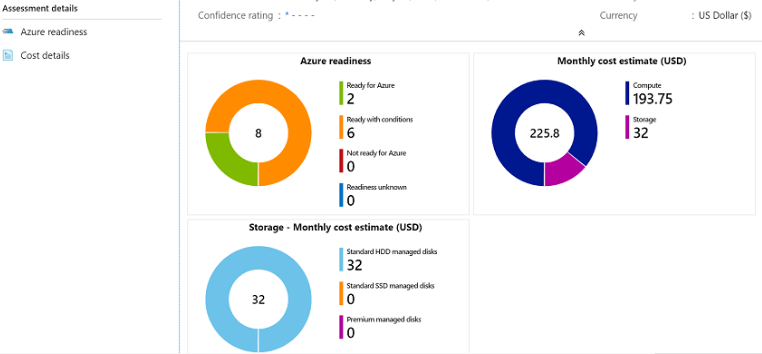
You can also open your assessment online in your browser by clicking on it in the Azure portal. You’ll see something similar to this:
Let’s review the Azure Readiness to determine if we are ready to move some servers into Azure!
Review your VM status at a glance:
- Ready for Azure: Azure Migrate recommends a VM size and cost estimates for VMs in the assessment.
- Ready with conditions: Shows issues and suggested remediation.
- Not ready for Azure: Shows issues and suggested remediation.
- Readiness unknown: Used when Azure Migrate can’t assess readiness, due to data availability issues.
Click on one of the Azure Readiness status to view VM readiness details. You can drill down and look at compute, storage, and networking details.
Next click on Cost Details and view the estimated cost of your Azure Migrate project to be hosted inside Azure. This is an estimated cost based on your actual consumed resources if you selected a Performance Based assessment; which is pretty awesome. You are able to see the cost estimates based on the suggested machine sizes and disk types. Only the VM and data costs are calculated here so remember that part. You may have other PaaS or SaaS costs, Express Route, or other charges related to running your systems that are not included in this assessment. Again here, you can drill down in the results and see details for each VM that is included in your assessment.
If you run a performance based assessment, you will also be able to see the confidence rating associated to each assessment. The more details an assessment gathers, the longer it runs (within reason) the better the confidence rating will be. If you’re seeing 1 Star, please read this article: https://docs.microsoft.com/en-us/azure/migrate/best-practices-assessment#best-practices-for-confidence-ratings
You have now completed the steps to get the Azure Migration appliance setup and configured, and performed an assessment. The next step is to setup an isolated virtual network in Azure and perform a test-failover. This is how you know your data will be accessible and that the Azure Migrate replication process is successful.
Enjoy your Azure super-powers and ability to show how ready you are to migrate into Azure…and explain to your Management how much the VM cost is estimated to be.
Working with Hyper-V? See: https://docs.microsoft.com/en-us/azure/migrate/tutorial-prepare-hyper-v
Working with a physical server? See: https://docs.microsoft.com/en-us/azure/migrate/tutorial-prepare-physical
Source: https://docs.microsoft.com/en-us/azure/migrate/tutorial-prepare-vmware