
Unveil Delete Operations in Azure using KQL
Welcome to another insightful journey through the azure skies! 🚀 In this blog post, we’ll explore how to wield the mighty KQL to uncover those elusive “delete” actions within your Azure environment. Whether you’re a seasoned cloud explorer or just dipping your toes into the Azure waters, this guide will equip you with the knowledge to track down those vanishing resources.
Why Hunt for Deletes?
Picture this: You’re managing a busy Azure subscription, and suddenly, a critical resource disappears into thin air. Was it a misstep? A cosmic glitch? Fear not! By mastering KQL, you’ll be the Sherlock Holmes of the cloud, unraveling the mysteries of deletions.
The KQL Trailhead
Our journey begins with the AzureActivity table in your Log Analytics Workspace. When activity logs are exported via Diagnostic Settings, they find their cozy home here. Now, let’s get ready to go hunting and craft our KQL queries:
- All Delete Operations:
AzureActivity| where OperationNameValue contains "delete"
This query reveals all records involving delete operations. - Successful Deletions Only:
AzureActivity| where OperationNameValue contains "delete"| where ActivityStatusValue == "Success"
Use this query to filter out non-successful deletions. - Essential Details:
AzureActivity| where OperationNameValue contains "delete"| where ActivityStatusValue == "Success"| extend Temp = split(_ResourceId, '/')| extend Deleted_Resource = Temp[-1]| extend Deleted_ResourceType = Temp[-2]| project TimeGenerated, Caller, CallerIpAddress, Deleted_Resource, Deleted_ResourceType, ResourceGroup| order by TimeGenerated desc
The last query provides key information about the deleted resources with the details we need to understand accounts, IPs, and times of operations.
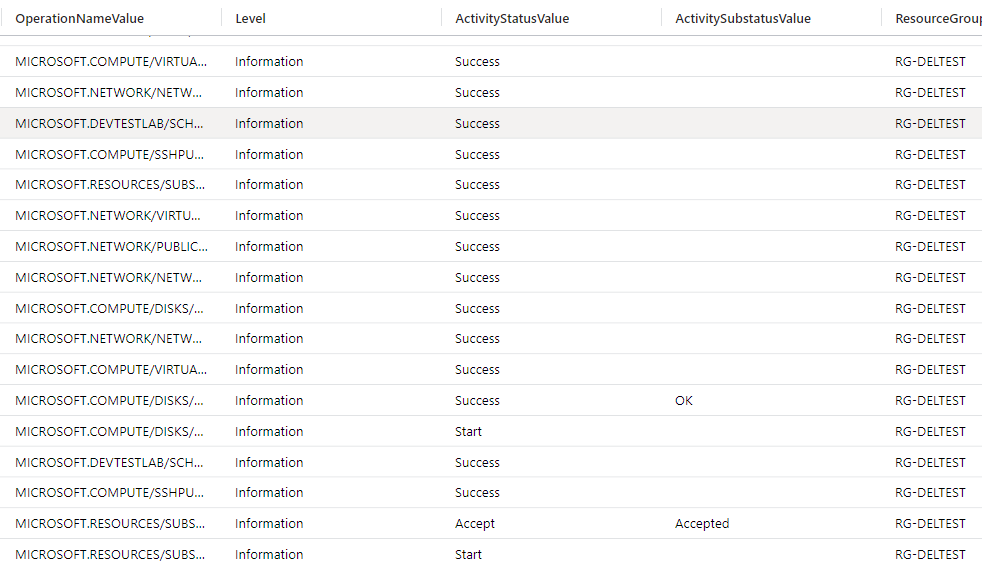
Our results from the first query start out a bit open and have some results that need refinement:
Let’s try query #3 and see what happens! The results look great and we can see the Caller, IPAddress, Deleted Resource, type of resource, and the Resource Group where that resource lived:
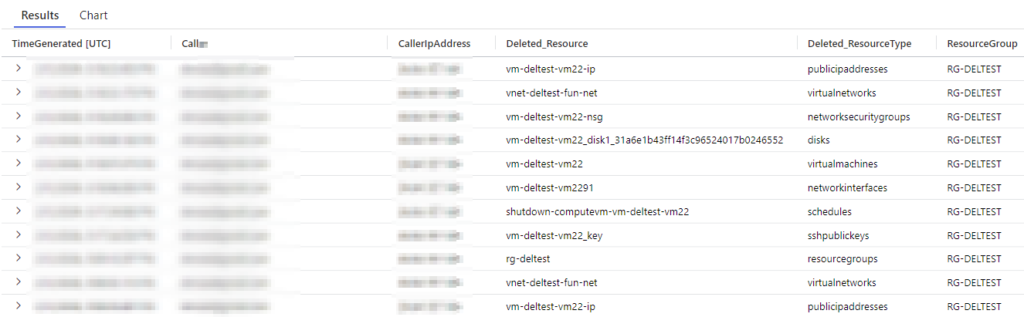
We know have all the information we need to see the account and surrounding details of the deleted resources!
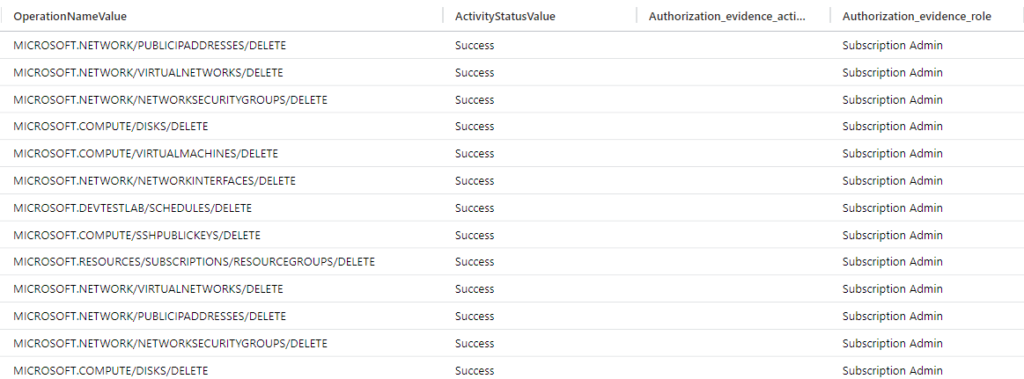
An additional query that can provide some insights to steps taken by a specific administrator account may look a bit like this:
AzureActivity
| where TimeGenerated > ago(2d) // adjust the time range as needed
| where OperationNameValue contains "delete"
| where Caller == "AdminAccount@Domain.com"
| extend Authorization = parse_json(Authorization)
| project TimeGenerated, OperationNameValue, ActivityStatusValue, Authorization.evidence.action, Authorization.evidence.role, _ResourceId
Our results now look like this:
There is usually more than one way to get results when we are investigating accounts and resources in Azure. It’s important to keep exploring and understand our logs.
Your Azure Adventure Awaits
So, fellow cloud wanderer, grab your KQL compass, and let’s embark on this thrilling quest. Whether you’re safeguarding your precious VMs or rescuing lost storage accounts, KQL will be your trusty sidekick.
Stay tuned for more azure escapades right here on AzureTracks.com!
Remember, the Azure skies hold many secrets, but with KQL, you’ll decipher them one query at a time. Until next time, happy cloud hunting! ☁️🔍