
Deploying Microsoft Sentinel with PowerShell – Part 2
Join me for Part 2 of deploying Microsoft Sentinel so that we can test different scenarios with data connectors, analytics rules, hunting queries, and automations. Together, we are building a way to quickly deploy Sentinel to allow testing and validations outside production. Let’s dive right in today!
Catch up on Part 1 here: https://azuretracks.com/2023/03/deploying-microsoft-sentinel-with-powershell/
Last time, we left off needing to do some configuration of:
- RBAC Permissions
- Data Connectors, and
- Analytics Rules
Same as in Part 1, customize the names of resources as needed to fit your environment and naming conventions. Something I really like to do in a Test Environment is to try and follow the proper naming structure for my client. This helps everyone get used to dealing with the correct formats and naming short-forms.
Assigning Permissions
The first task in configuring Sentinel is to assign permissions to the workspace. To do this, we need to create a new Azure AD application and assign it the required roles. Here’s how you can create a new Azure AD application using PowerShell:
$applicationName = "SentinelApp"
$password = ConvertTo-SecureString -String "Password123" -AsPlainText -Force

$application = New-AzADApplication `
    -DisplayName $applicationName `
    -Password $password

New-AzADServicePrincipal `
    -ApplicationId $application.ApplicationId
This command creates a new Azure AD application named “SentinelApp” and generates a new password. The command then creates a new service principal using the application ID.
Next, we need to assign the required roles to the service principal. Here’s how you can do this using PowerShell:
$roleDefinitionId = (Get-AzRoleDefinition -Name "Log Analytics Contributor").Id

New-AzRoleAssignment `
    -RoleDefinitionId $roleDefinitionId `
    -ServicePrincipalName $application.ApplicationId
This code for New-AzRoleAssignment assigns the “Log Analytics Contributor” role to the service principal, giving it the required permissions to manage resources in the Log Analytics workspace.
Create Data Connectors
The next task in configuring Sentinel is to create data connectors that will ingest data from various sources. We can do this manually in the Azure Portal by navigating to Microsoft Sentinel > select the Log Analytics Workspace we created that is Sentinel Enabled > under Configuration choose Data Connectors.
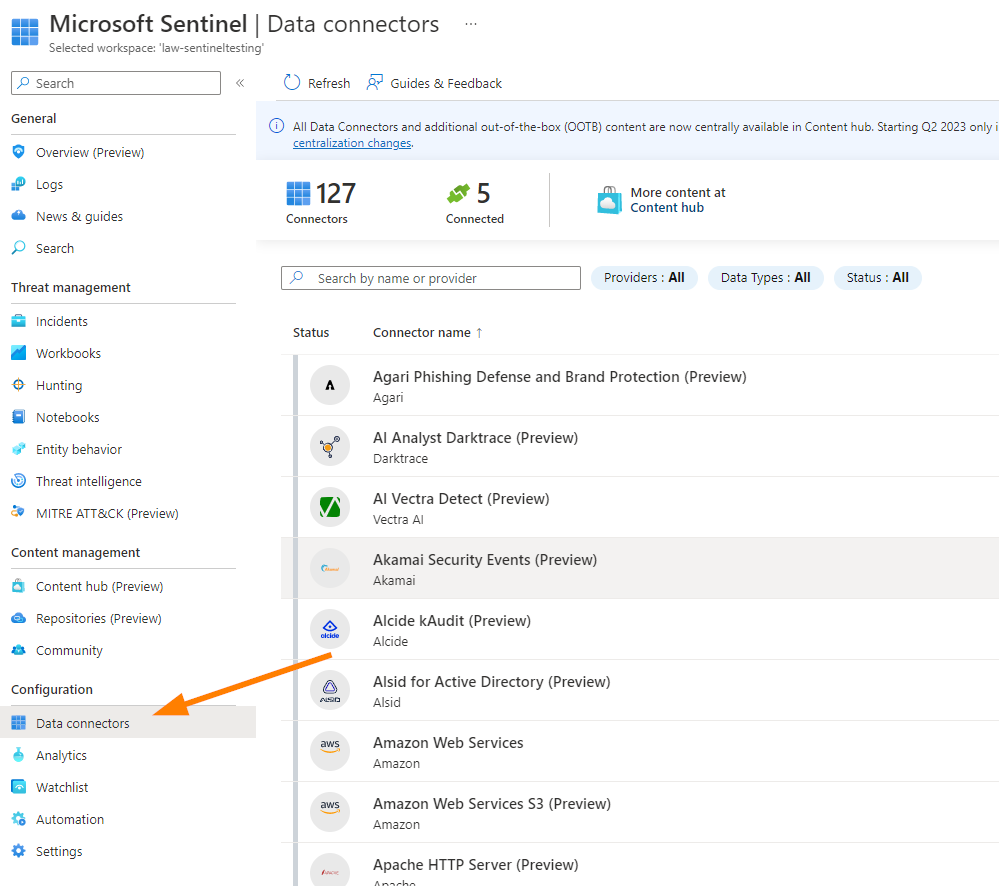
Next, select the data connector to enable. In this example we’ll choose AWS:
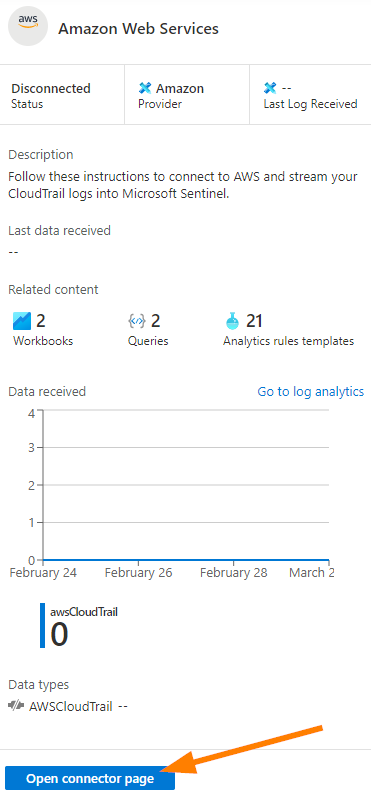
Click on Open Connector and the Configuration blade will open where you can configure the details for this connector:
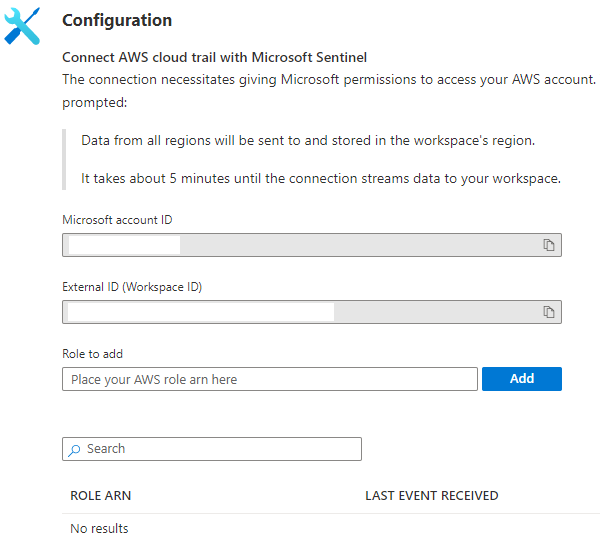
Click on ADD here once configured, and you will receive another prompt.
To use PowerShell and add the Azure Activity data connector, do the following:
$workspaceId = (Get-AzOperationalInsightsWorkspace -ResourceGroupName "SentinelResourceGroup" -Name "SentinelWorkspace").ResourceId

New-AzSentinelDataConnector `
    -WorkspaceId $workspaceId `
    -ConnectorKind AzureActivity `
    -ConnectorName "AzureActivity"
This PowerShell creates a new data connector that ingests Azure Activity logs into Sentinel. You can create data connectors for other sources, such as Microsoft 365, Azure Active Directory, and third-party solutions, by changing the connector kind and connector name parameters.
Set up Analytics Rules
The final task in configuring our testing deployment of Microsoft Sentinel is to set up analytics rules that will detect potential security incidents. To create an analytics rule, use the following PowerShell command:
$ruleName = "PotentialSecurityIncident"
$query = "SecurityEvent | where EventID == 4625"
$queryFrequency = "PT5M"
$severity = "High"

New-AzSentinelAlertRule `
    -WorkspaceId $workspaceId `
    -Name $ruleName `
    -Query $query `
    -QueryFrequency $queryFrequency `
    -Severity $severity
This code snippit creates a new analytics rule that detects potential security incidents by querying the SecurityEvent table for Event ID 4625. The query frequency is set to five minutes, and the severity is set to high. You can create additional analytics rules by changing the query and severity parameters.
Specifically, Event ID 4625 in Windows Security Event Log indicates: An account failed to log on. This event id is valid for Windows Server 2008R2, Windows 7, Windows 2012R2, Windows 8.1, WIndows Server 2016, Windows 10, Windows 11, Windows Server 2019 and Windows Server 2022. Related events you may explore in a KQL query would include at least Event IDs:
- 529
- 530
- 531
- 532
- 533
- 534
- 535
- 536
- 537
- 539
Event ID 4625 is a helpful event to investigate in some cases because logs each and every failed logon event regardless of the logon type, location, or the type of user account.
Verify Deployment
Finally, we need to verify that our deployment was successful by checking the Sentinel dashboard and verifying that data is being ingested and analyzed.
To do this, navigate to the Sentinel dashboard in the Azure portal and check the Data Connectors and Analytics sections. You should see data connectors for the sources you configured and analytics rules for the queries you created.
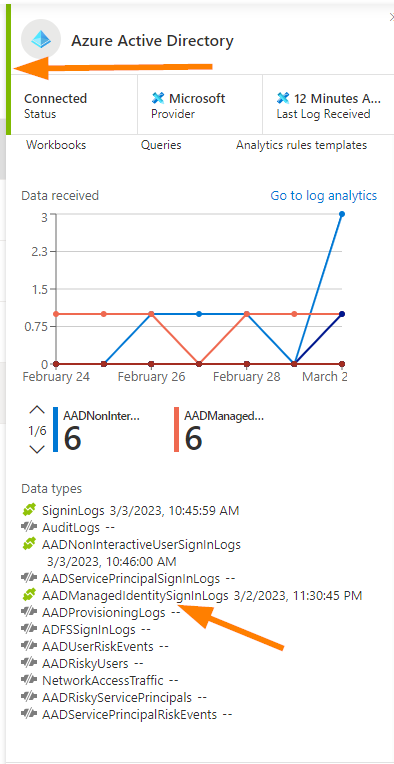
You will see (above) on the Data Connector, that we have data flowing in on our selected data types from our connector. Visually validating that our data is coming in correctly.
Conclusion
In this post, we walked through the steps to deploy Microsoft Sentinel using PowerShell and included code samples for automating some common tasks. With Sentinel, you can detect, investigate, and respond to security incidents across your enterprise and use advanced analytics and machine learning to identify potential threats. By automating the deployment process with PowerShell, you can save time and help remove barriers to deploying a testing implementation for Microsoft Sentinel. Once your testing is completed, remember to decommission and delete your resources since we know how to quickly deploy them for the next time we need to do some testing!