
Deploy a Custom Azure Policy
There are over 600 stock Azure Policies to help enforce standardization and governance in your Azure subscriptions right now; but what if you need to accomplish something a bit different? Very often organizations need to have a customized solution to help solve a problem — often tagging or power related — and a custom Azure Policy may be the answer. Today, we’ll take a look at creating a custom Azure Policy using JSON from GitHub and the Azure Portal.
Something that I think is a lot of fun is trying out new things and seeing how we can use something that is seemingly small but has a big impact. Welcome to Azure Policy in a nutshell right there!
What is Azure Policy?
Azure Policy helps to enforce organizational standards and to assess compliance at-scale. Through its compliance dashboard, it provides an aggregated view to evaluate the overall state of the environment, with the ability to drill down to the per-resource, per-policy granularity. It also helps to bring your resources to compliance through bulk remediation for existing resources and automatic remediation for new resources.
Common use cases for Azure Policy include implementing governance for resource consistency, regulatory compliance, security, cost, and management. Policy definitions for these common use cases are already available in your Azure environment as built-ins to help you get started.
All Azure Policy data and objects are encrypted at rest. Get all the details from the Microsoft Docs source here.
How can I get started with Azure Policy?
I’ve covered a few topics on governance in previous articles that detail topics such as naming standards, tagging, and types of resources that can all be governed with Azure Policy, so have a look around the AzureTracks website if your curious.
That said, let’s get started by creating our very own custom policy and then enforcing it. Now, this is going to cause machines to shut down on a schedule, so please only use your Dev/Test environment for this tutorial!
Again, CAUTION – CAUTION.
How to Import the Microsoft DevTest Labs Azure Policy
Ok, first let’s get logged into https://portal.azure.com and search for Policy. Select Policy.

Then select Definitions:

Next select +Policy Definition
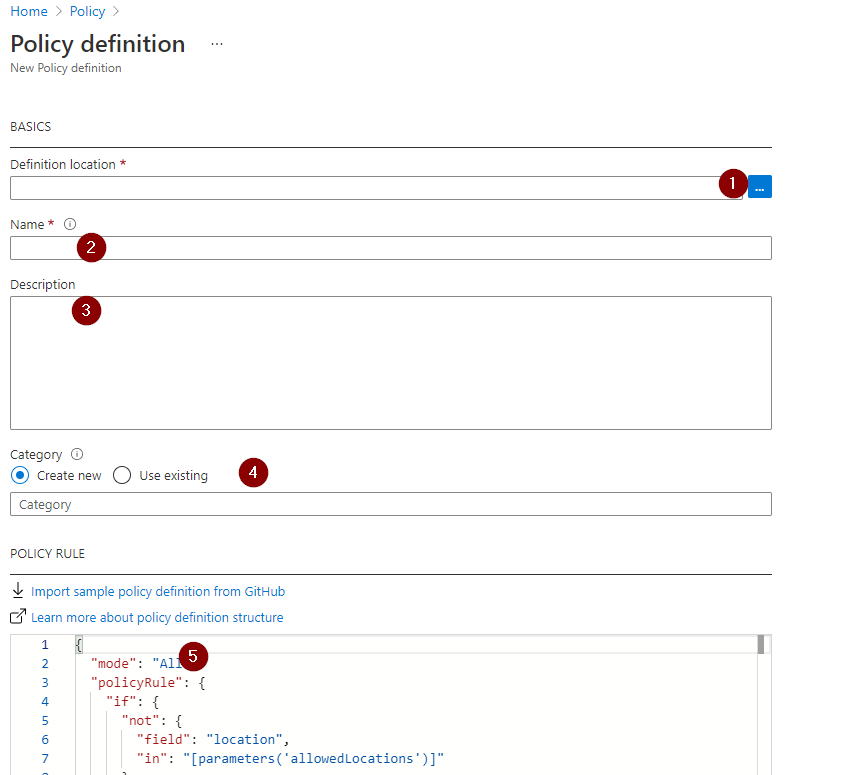
Now let’s select a Definition location, enter a name, enter a description, then select a category such as VM Power Management. If the category does not exist, you can select Create new and then enter VM Power Management.
Lastly on this New Policy Definition screen let’s enter the JSON from the bottom of this article in the code block. Copy and paste is the easiest way, or you can save it on GitHub as well then import it. This is useful if you will be doing this multiple times such as for many subscriptions.
Ensure that you click on Save near the bottom of the screen when you’re ready.
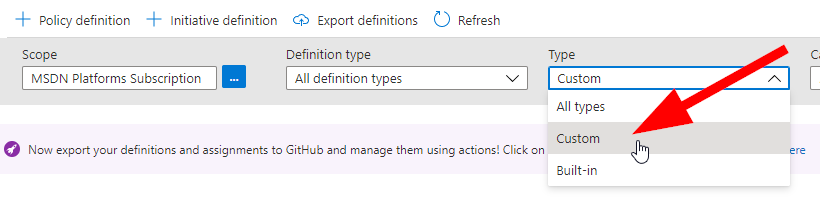
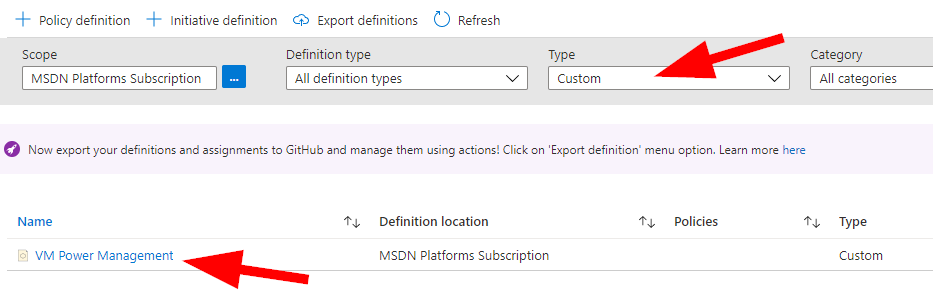
Back on the main Azure Policy screen you can now change the Type drop-down to Custom and view your custom policy that you just created. It’s super easy!
Cool. Now let’s get this policy set up so it applies to something. Let’s click on Policy > Assignments.
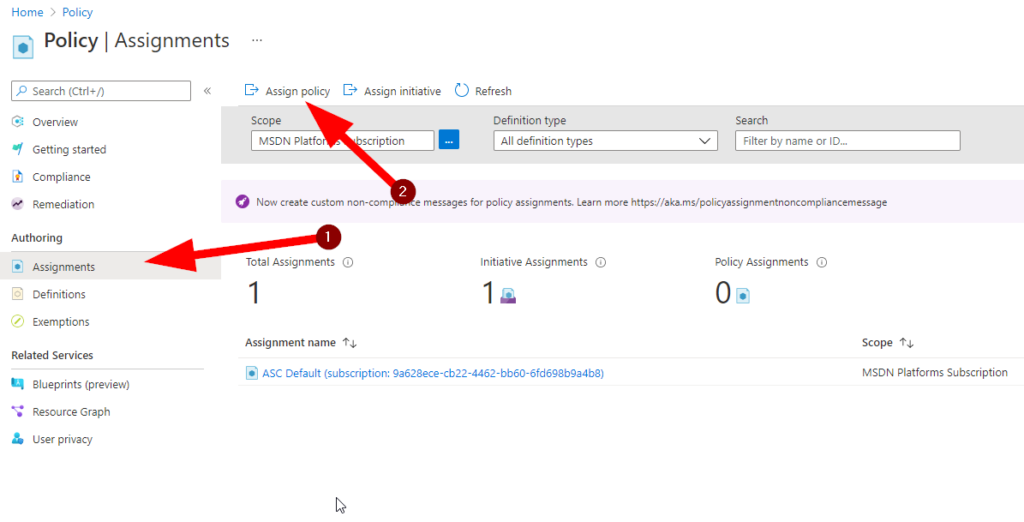
Next select ->Assign Policy near the top.
Now you’ll see a familiar blade where we can configure the Basics in our Policy assignment.
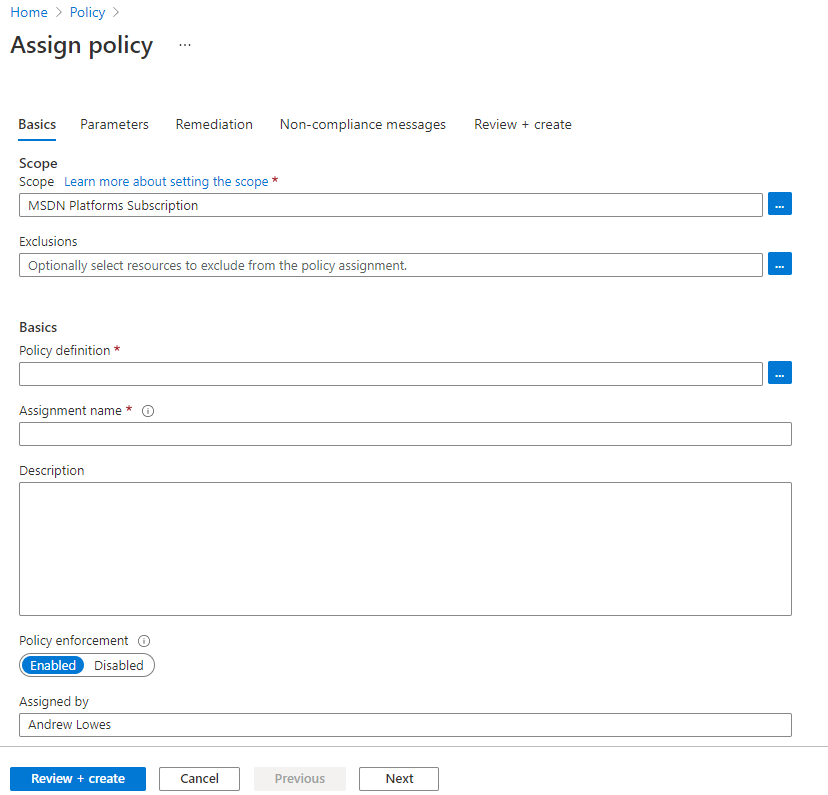
Select your Subscription, then select any exclusions from this policy. Notice that the whole idea here is to apply to everything within the subscription and then just exclude any special cases.
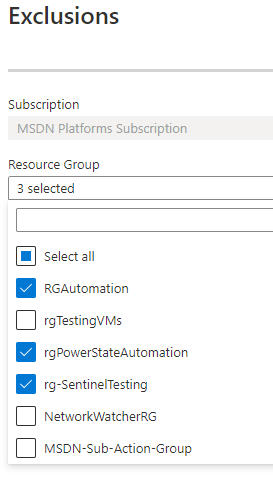
I’ve selected a few resource groups that I use for automation, so I don’t want to shut down any VMs running in those resource groups, but everything else is added by default; this does include any NEW resource groups created in the future.
Next, select Policy Definition and the change the Type to Custom and select the policy that we created.
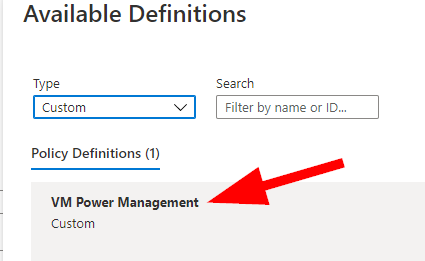
Select this policy and then at the bottom of the blade click on Select.
Your screen should look similar (your own names, etc) to this:
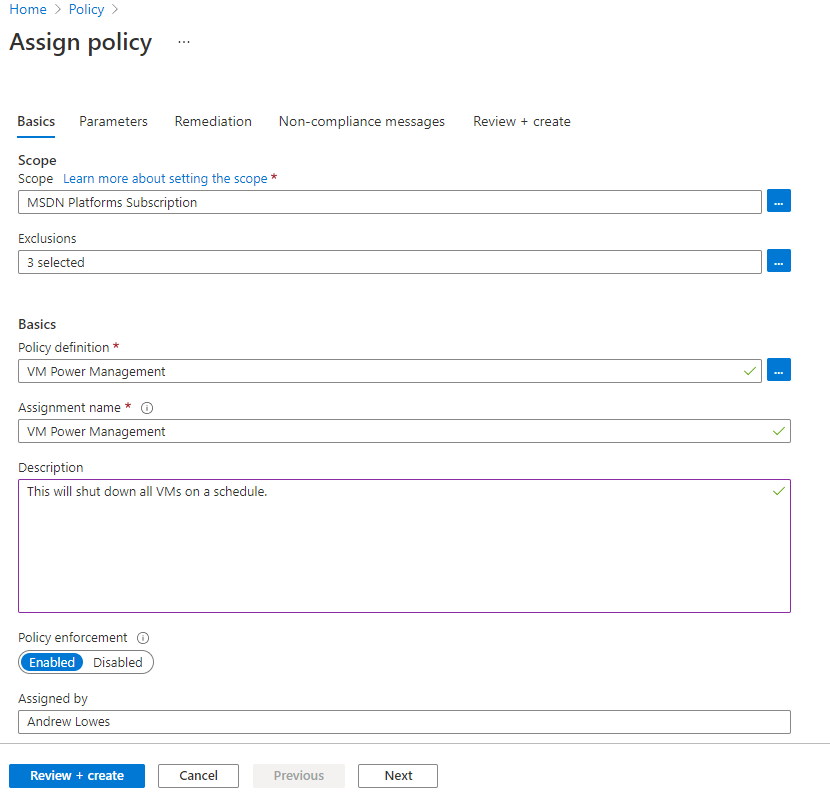
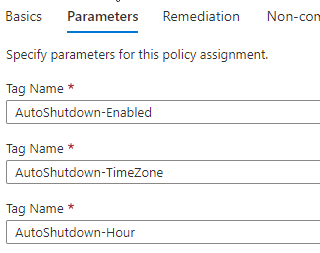
Now click on Next and review the Parameters, which are Tags that will be attached to all VM resources that are in-scope.
Click on Next.
On the Remediation tab now:
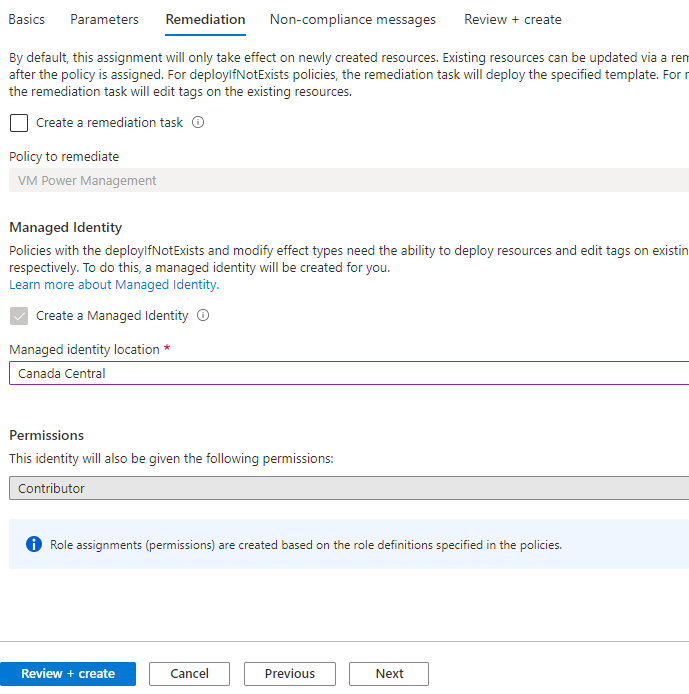
You’ll notice that we need to select the Managed Identity Region as Canada Central to match my other resources, so go ahead select a region that is local for you, or where you have most of your resources in this scope.
Click on next and enter a custom Remediation message if needed, then click on Create when you’re ready.
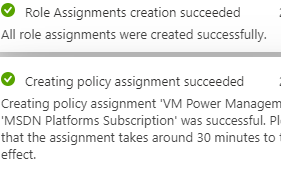
Click on Review + Save near the bottom when you are ready. It takes about 5 seconds to write the policy, but I’m going to suggest you wait about 1 hour before editing tags on the VMs to configure any settings.
Now that the Policy part is done, let’s have a look at the VMs together.
Configure Virtual Machine Tags
Now, let’s start by saying that you can use other policies to set the tag values here; but in our example we’re just going to review a VM manually. Since Azure Policy is really intended to manage your subscription at scale, I suggest that once you’re familiar with the settings and how to manage policies/apply policies; that you do use them to help make less work for yourself.
Ok, with all that said, let’s take a look at the VM here:

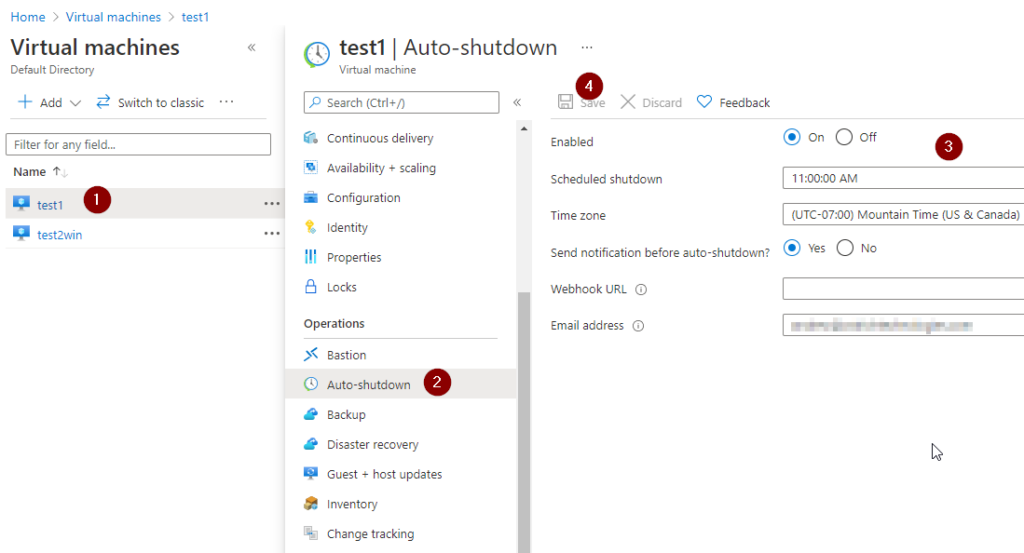
Select your virtual machine, then click on Auto-Shutdown under Operations. Then enter your configuration as needed here. Make sure you set the shutdown time out by more than 1 hour since our policy will notify at 60 minutes right? (Note the JSON code for this tidbit & I added an extra note at the end of this article for your reference on this timing.)
Once you’ve entered either a webhook or email addresses (Groups, etc do work very well here too FYI), go ahead and click on Save up near the top.
Now, when you receive a notification before a VM shuts down, it will look very much like this:
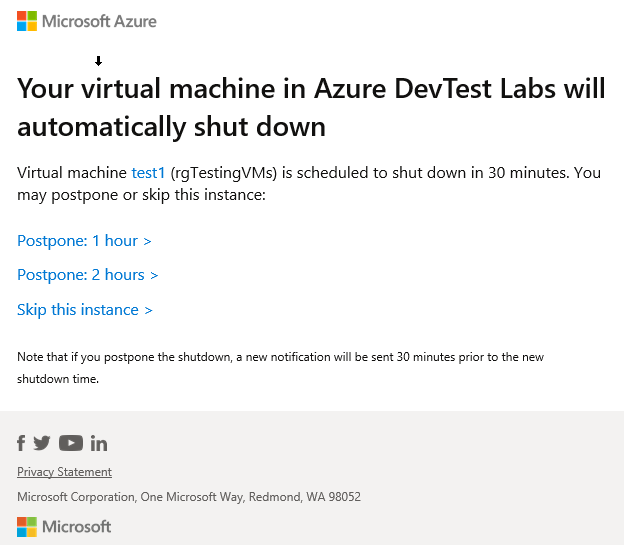
You are able to defer shutdown for 1 or 2 hours or skip it all-together for this date. This allows your staff to continue working on an exception basis while forcing the policy to be the default configuration.
The source for this walkthrough is on Microsoft Docs here.
The JSON to Create the Policy
{
"mode": "Indexed",
"policyRule": {
"if": {
"allOf": [
{
"field": "type",
"equals": "Microsoft.Compute/virtualMachines"
},
{
"field": "[concat('tags[', parameters('tagAutoShutdownEnabled'), ']')]",
"exists": "true"
},
{
"field": "[concat('tags[', parameters('tagAutoShutdownHour'), ']')]",
"exists": "true"
},
{
"field": "[concat('tags[', parameters('tagAutoShutdownTimeZone'), ']')]",
"exists": "true"
}
]
},
"then": {
"effect": "deployIfNotExists",
"details": {
"type": "Microsoft.DevTestLab/schedules",
"name": "[concat('shutdown-computevm-', field('name'))]",
"existenceCondition": {
"allOf": [
{
"field": "tags.AutoShutdown-Enabled",
"equals": "[field('tags.AutoShutdown-Enabled')]"
},
{
"field": "tags.AutoShutdown-Hour",
"equals": "[field('tags.AutoShutdown-Hour')]"
},
{
"field": "tags.AutoShutdown-TimeZone",
"equals": "[field('tags.AutoShutdown-TimeZone')]"
}
]
},
"roleDefinitionIds": [
"/providers/Microsoft.Authorization/roleDefinitions/b24988ac-6180-42a0-ab88-20f7382dd24c"
],
"deployment": {
"properties": {
"mode": "incremental",
"template": {
"$schema": "https://schema.management.azure.com/schemas/2015-01-01/deploymentTemplate.json#",
"contentVersion": "1.0.0.0",
"parameters": {
"vmName": {
"type": "string"
},
"location": {
"type": "string"
},
"status": {
"type": "string",
"allowedValues": [
"Enabled",
"Disabled"
]
},
"shutdownHour": {
"type": "string"
},
"timeZone": {
"type": "string"
}
},
"variables": {
"shutdownHour": "[replace(parameters('shutdownHour'), ':', '')]"
},
"resources": [
{
"type": "Microsoft.DevTestLab/schedules",
"apiVersion": "2016-05-15",
"name": "[concat('shutdown-computevm-', parameters('vmName'))]",
"location": "[parameters('location')]",
"tags": {
"AutoShutdown-Enabled": "[parameters('status')]",
"AutoShutdown-TimeZone": "[parameters('timeZone')]",
"AutoShutdown-Hour": "[parameters('shutdownHour')]"
},
"properties": {
"status": "[parameters('status')]",
"taskType": "ComputeVmShutdownTask",
"dailyRecurrence": {
"time": "[variables('shutdownHour')]"
},
"timeZoneId": "[parameters('timeZone')]",
"notificationSettings": {
"status": "Disabled",
"timeInMinutes": 60
},
"targetResourceId": "[resourceId('Microsoft.Compute/virtualMachines', parameters('vmName'))]"
}
}
],
"outputs": {
"policy": {
"type": "string",
"value": "[concat('Autoshutdown configured for VM', parameters('vmName'))]"
}
}
},
"parameters": {
"vmName": {
"value": "[field('name')]"
},
"location": {
"value": "[field('location')]"
},
"status": {
"value": "[field('tags.AutoShutdown-Enabled')]"
},
"shutdownHour": {
"value": "[field('tags.AutoShutdown-Hour')]"
},
"timeZone": {
"value": "[field('tags.AutoShutdown-TimeZone')]"
}
}
}
}
}
}
},
"parameters": {
"tagAutoShutdownEnabled": {
"type": "String",
"metadata": {
"displayName": "Tag Name",
"description": null
},
"defaultValue": "AutoShutdown-Enabled"
},
"tagAutoShutdownTimeZone": {
"type": "String",
"metadata": {
"displayName": "Tag Name",
"description": null
},
"defaultValue": "AutoShutdown-TimeZone"
},
"tagAutoShutdownHour": {
"type": "String",
"metadata": {
"displayName": "Tag Name",
"description": null
},
"defaultValue": "AutoShutdown-Hour"
}
}
}
Can I Customize This Policy?
Yes! You can customize this policy with a couple of easy edits:
-“value”: “[concat(‘Autoshutdown configured for VM’, parameters(‘vmName’))]”
-The above line is the message you will see with the variable name ‘vmName’ as the name of the vm that is shutting down.
-“timeInMinutes”: 60
-This is the number of minutes before shutdown that you will receive an email at the configured address in the vm tags configured after policy is applied.
Well thank you for joining me on this Azure Policy journey today! There is a lot of power in this tool and the options just keep growing for how we can take advantage and have good governance in our Azure Subscriptions. Until next time….